1.理解Flink的图结构
第一部分讲到,我们的主函数最后一项任务就是生成StreamGraph,然后生成JobGraph,然后以此开始调度任务运行,所以接下来我们从这里入手,继续探索Flink。
1.1 Flink的三层图结构
事实上,Flink总共提供了三种图的抽象,我们前面已经提到了StreamGraph和JobGraph,还有一种是ExecutionGraph,是用于调度的基本数据结构。
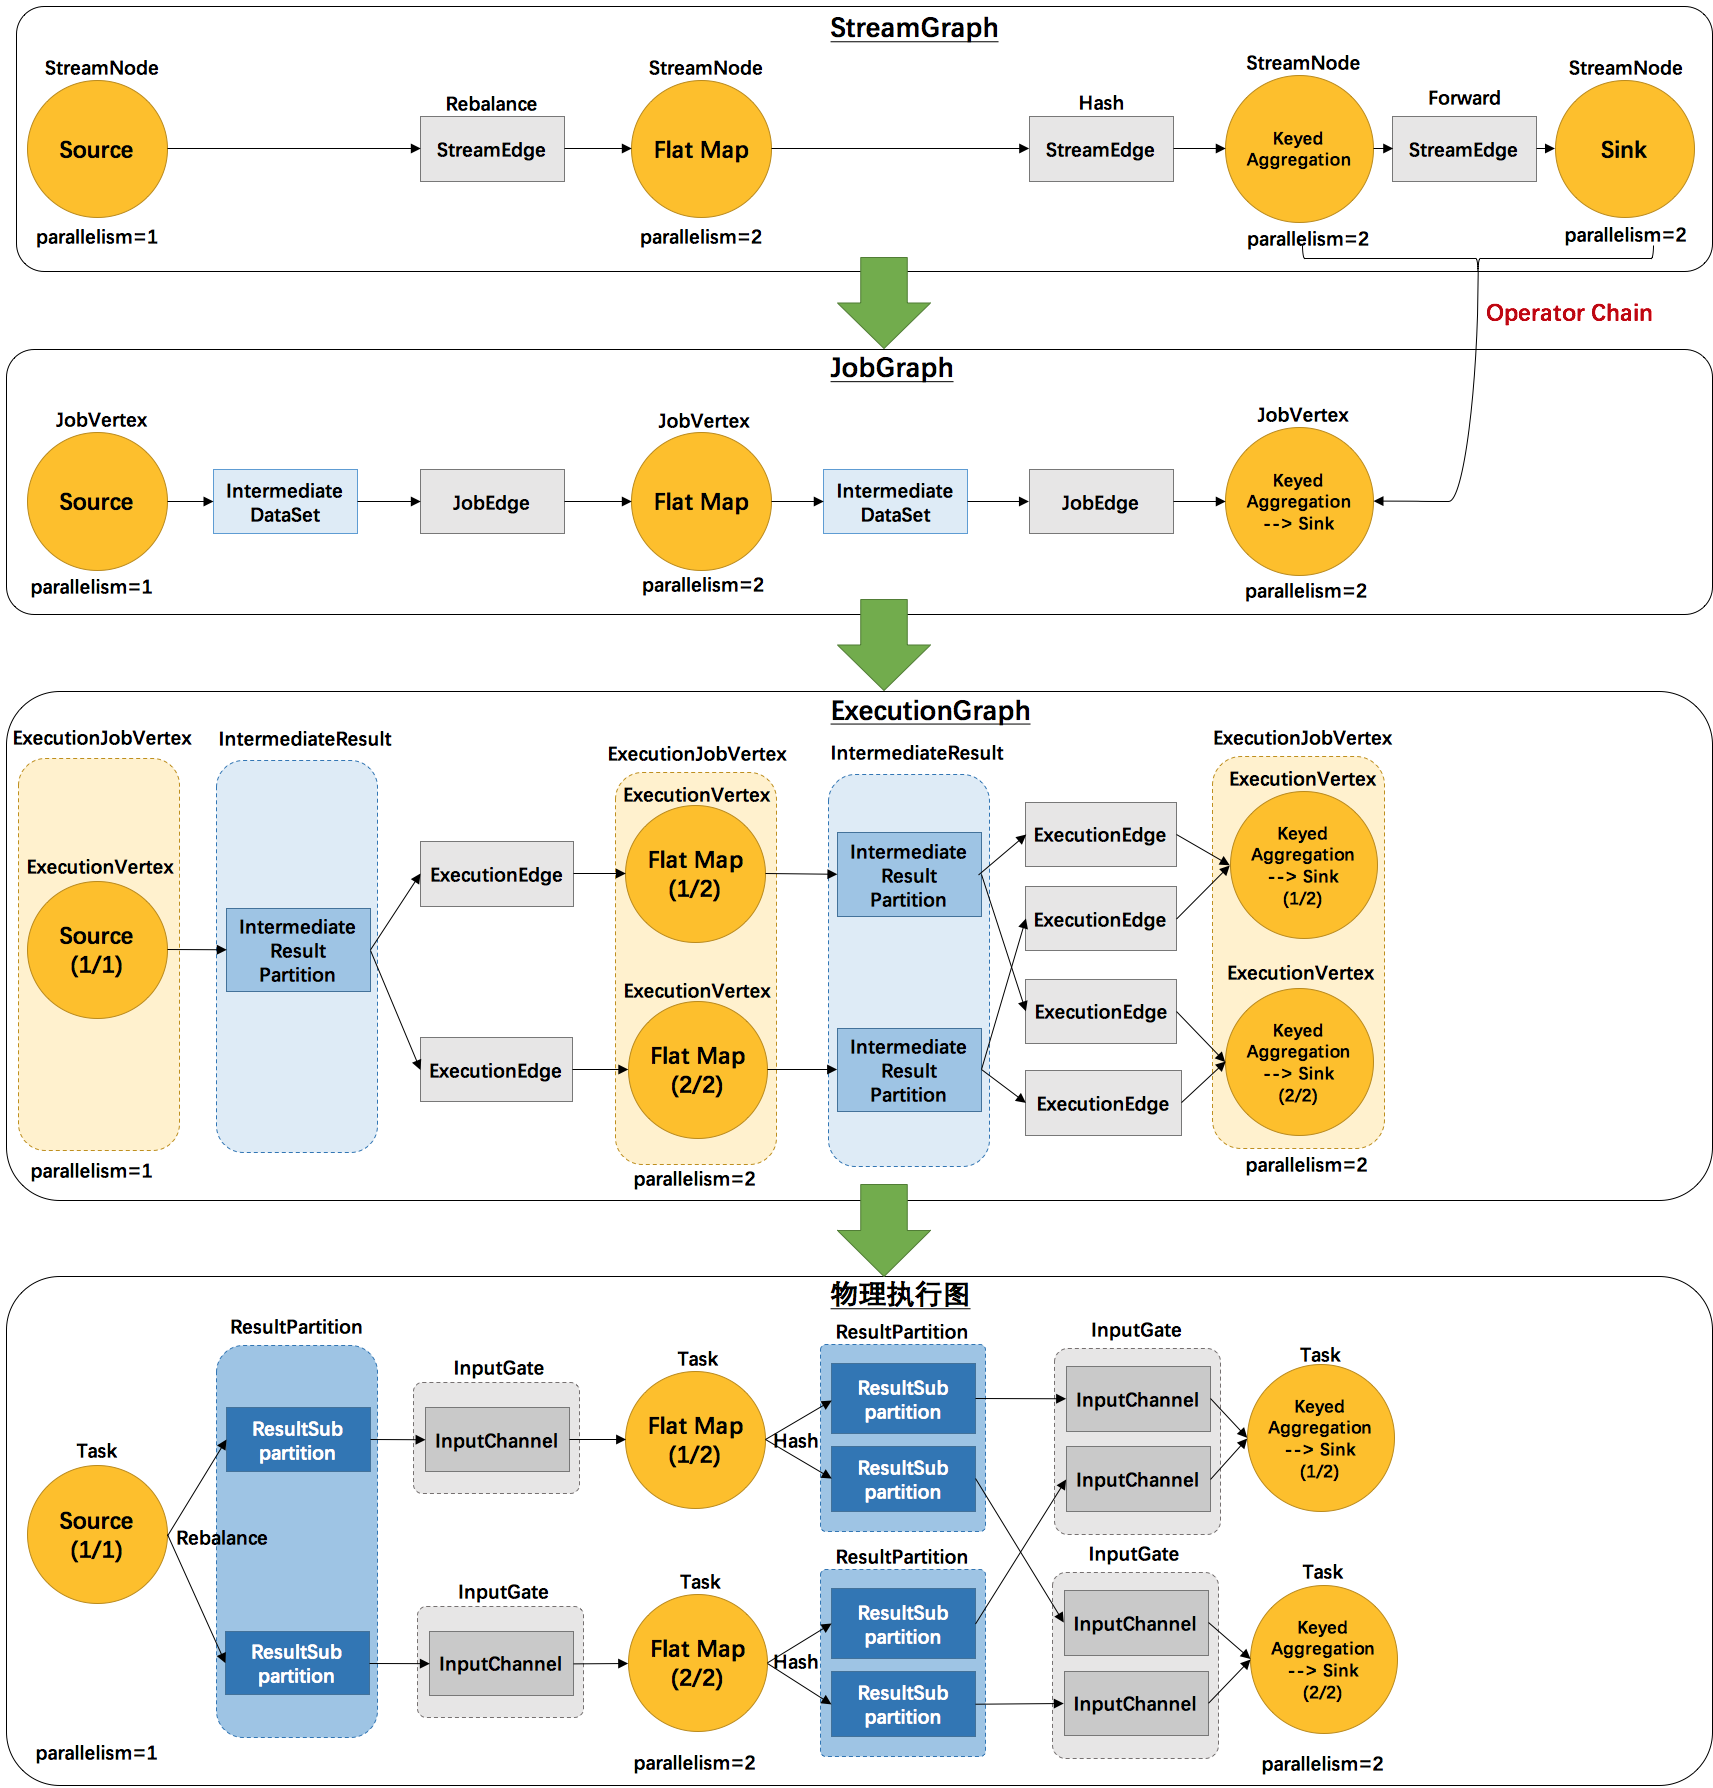
上面这张图清晰的给出了Flink各个图的工作原理和转换过程。其中最后一个物理执行图并非Flink的数据结构,而是程序开始执行后,各个task分布在不同的节点上,所形成的物理上的关系表示。
- 从JobGraph的图里可以看到,数据从上一个operator流到下一个operator的过程中,上游作为生产者提供了IntermediateDataSet,而下游作为消费者需要JobEdge。事实上,JobEdge是一个通信管道,连接了上游生产的dataset和下游的JobVertex节点。
- 在JobGraph转换到ExecutionGraph的过程中,主要发生了以下转变:
- 加入了并行度的概念,成为真正可调度的图结构
- 生成了与JobVertex对应的ExecutionJobVertex,ExecutionVertex,与IntermediateDataSet对应的IntermediateResult和IntermediateResultPartition等,并行将通过这些类实现
- ExecutionGraph已经可以用于调度任务。我们可以看到,Flink根据该图生成了一一对应的Task,每个task对应一个ExecutionGraph的一个Execution。Task用InputGate、InputChannel和ResultPartition对应了上面图中的IntermediateResult和ExecutionEdge。
那么,Flink抽象出这三层图结构,四层执行逻辑的意义是什么呢?
StreamGraph是对用户逻辑的映射。JobGraph在此基础上进行了一些优化,比如把一部分操作串成chain以提高效率。ExecutionGraph是为了调度存在的,加入了并行处理的概念。而在此基础上真正执行的是Task及其相关结构。
2.StreamGraph的生成
在第一节的算子注册部分,我们可以看到,Flink把每一个算子transform成一个对流的转换(比如上文中返回的SingleOutputStreamOperator是一个DataStream的子类),并且注册到执行环境中,用于生成StreamGraph。实际生成StreamGraph的入口是
1 | //其中的transformations是一个list,里面记录的就是我们在transform方法中放进来的算子。 |
StreamTransformation代表了从一个或多个DataStream生成新DataStream的操作。顺便,DataStream类在内部组合了一个StreamTransformation类,实际的转换操作均通过该类完成。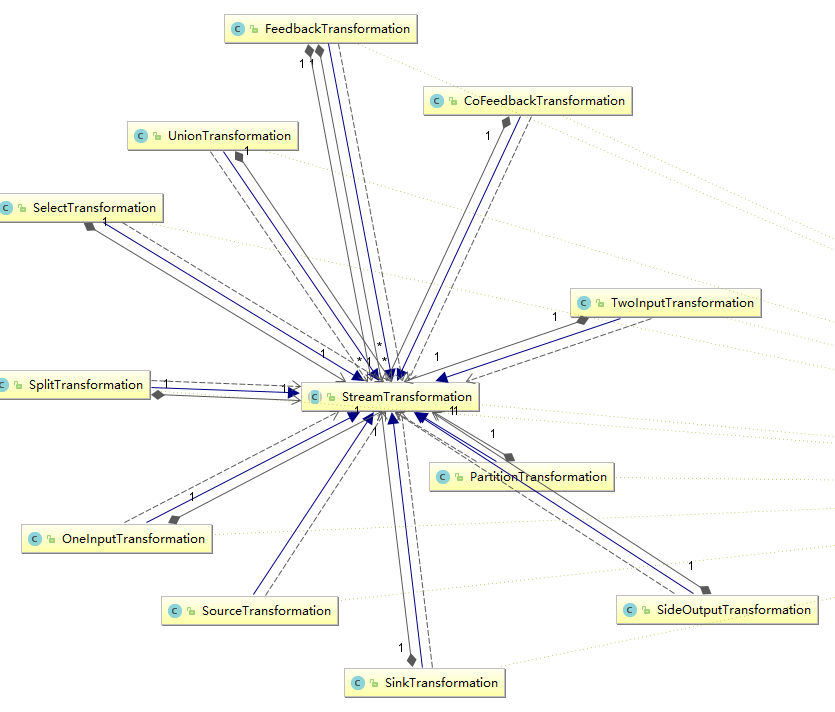
我们可以看到,从source到各种map,union再到sink操作全部被映射成了StreamTransformation。
其映射过程如下所示: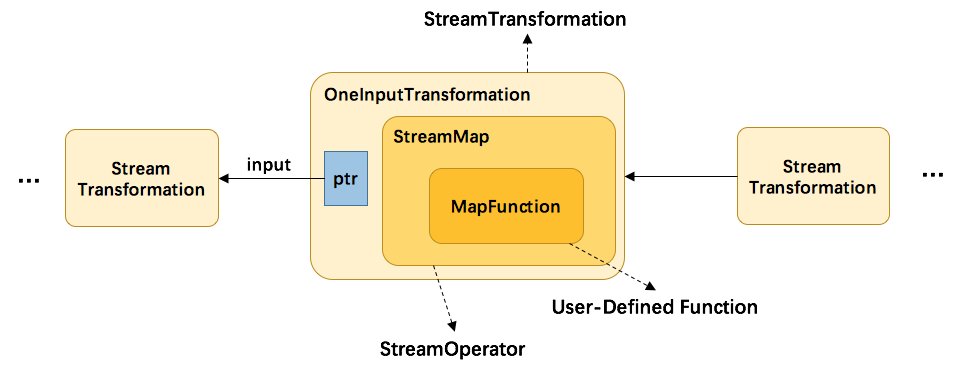
以MapFunction为例:
- 首先,用户代码里定义的UDF会被当作其基类对待,然后交给StreamMap这个operator做进一步包装。事实上,每一个Transformation都对应了一个StreamOperator。
- 由于map这个操作只接受一个输入,所以再被进一步包装为OneInputTransformation。
- 最后,将该transformation注册到执行环境中,当执行上文提到的generate方法时,生成StreamGraph图结构。
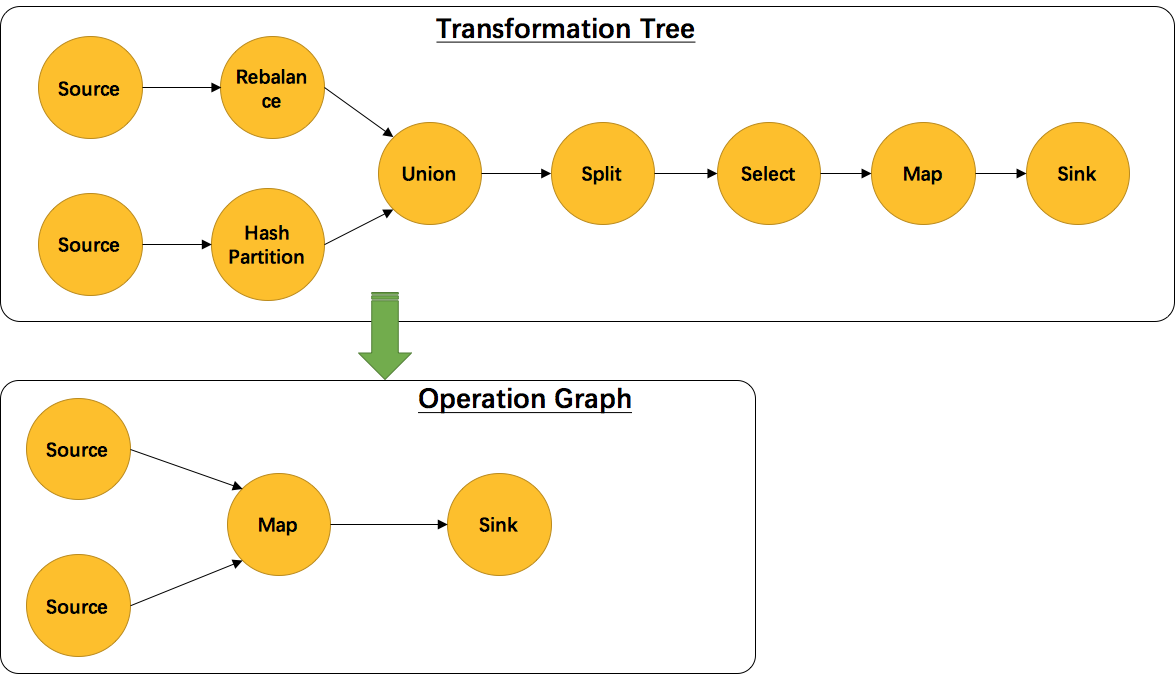
另外,并不是每一个StreamTransformation都会转换成runtime层中的物理操作。有一些只是逻辑概念,比如union、split/select、partition等。如下图所示的转换树,在运行时会优化成下方的操作图
3.StreamGraph生成函数分析
我们从StreamGraphGenerator.generate()方法往下看:
1 | public static StreamGraph generate(StreamExecutionEnvironment env, List<StreamTransformation<?>> transformations) { |
因为map,filter等常用操作都是OneInputStreamOperator,我们就来看看transformOneInputTransform方法。1
2
3
4
5
6
7
8
9
10
11
12
13
14
15
16
17
18
19
20
21
22
23
24
25
26
27
28
29
30
31
32
33
34
35
36
37
38
39
40
41
42
43
44
45
46
47
48
49
50
51
52
53
54
55
56
57
58
59
60
61
62
63
64
65
66
67
68
69
70
71
72
73
74
75
76
77
78
79
80
81
82
83
84
85
86
87
88
89
90
91
92
93
94
95
96
97
98
99
100
101
102
103
104
105
106
107
108
109
110
111
112private <IN, OUT> Collection<Integer> transformOneInputTransform(OneInputTransformation<IN, OUT> transform) {
Collection<Integer> inputIds = transform(transform.getInput());
// 在递归处理节点过程中,某个节点可能已经被其他子节点先处理过了,需要跳过
if (alreadyTransformed.containsKey(transform)) {
return alreadyTransformed.get(transform);
}
//这里是获取slotSharingGroup。这个group用来定义当前我们在处理的这个操作符可以跟什么操作符chain到一个slot里进行操作
//因为有时候我们可能不满意Flink替我们做的chain聚合
//一个slot就是一个执行task的基本容器
String slotSharingGroup = determineSlotSharingGroup(transform.getSlotSharingGroup(), inputIds);
//把该operator加入图
streamGraph.addOperator(transform.getId(),
slotSharingGroup,
transform.getOperator(),
transform.getInputType(),
transform.getOutputType(),
transform.getName());
//对于keyedStream,我们还要记录它的keySelector方法
//Flink并不真正为每个keyedStream保存一个key,而是每次需要用到key的时候都使用keySelector方法进行计算
//因此,我们自定义的keySelector方法需要保证幂等性
//到后面介绍keyGroup的时候我们还会再次提到这一点
if (transform.getStateKeySelector() != null) {
TypeSerializer<?> keySerializer = transform.getStateKeyType().createSerializer(env.getConfig());
streamGraph.setOneInputStateKey(transform.getId(), transform.getStateKeySelector(), keySerializer);
}
streamGraph.setParallelism(transform.getId(), transform.getParallelism());
streamGraph.setMaxParallelism(transform.getId(), transform.getMaxParallelism());
//为当前节点和它的依赖节点建立边
//这里可以看到之前提到的select union partition等逻辑节点被合并入edge的过程
for (Integer inputId: inputIds) {
streamGraph.addEdge(inputId, transform.getId(), 0);
}
return Collections.singleton(transform.getId());
}
public void addEdge(Integer upStreamVertexID, Integer downStreamVertexID, int typeNumber) {
addEdgeInternal(upStreamVertexID,
downStreamVertexID,
typeNumber,
null,
new ArrayList<String>(),
null);
}
//addEdge的实现,会合并一些逻辑节点
private void addEdgeInternal(Integer upStreamVertexID,
Integer downStreamVertexID,
int typeNumber,
StreamPartitioner<?> partitioner,
List<String> outputNames,
OutputTag outputTag) {
//如果输入边是侧输出节点,则把side的输入边作为本节点的输入边,并递归调用
if (virtualSideOutputNodes.containsKey(upStreamVertexID)) {
int virtualId = upStreamVertexID;
upStreamVertexID = virtualSideOutputNodes.get(virtualId).f0;
if (outputTag == null) {
outputTag = virtualSideOutputNodes.get(virtualId).f1;
}
addEdgeInternal(upStreamVertexID, downStreamVertexID, typeNumber, partitioner, null, outputTag);
//如果输入边是select,则把select的输入边作为本节点的输入边
} else if (virtualSelectNodes.containsKey(upStreamVertexID)) {
int virtualId = upStreamVertexID;
upStreamVertexID = virtualSelectNodes.get(virtualId).f0;
if (outputNames.isEmpty()) {
// selections that happen downstream override earlier selections
outputNames = virtualSelectNodes.get(virtualId).f1;
}
addEdgeInternal(upStreamVertexID, downStreamVertexID, typeNumber, partitioner, outputNames, outputTag);
//如果是partition节点
} else if (virtualPartitionNodes.containsKey(upStreamVertexID)) {
int virtualId = upStreamVertexID;
upStreamVertexID = virtualPartitionNodes.get(virtualId).f0;
if (partitioner == null) {
partitioner = virtualPartitionNodes.get(virtualId).f1;
}
addEdgeInternal(upStreamVertexID, downStreamVertexID, typeNumber, partitioner, outputNames, outputTag);
} else {
//正常的edge处理逻辑
StreamNode upstreamNode = getStreamNode(upStreamVertexID);
StreamNode downstreamNode = getStreamNode(downStreamVertexID);
// If no partitioner was specified and the parallelism of upstream and downstream
// operator matches use forward partitioning, use rebalance otherwise.
if (partitioner == null && upstreamNode.getParallelism() == downstreamNode.getParallelism()) {
partitioner = new ForwardPartitioner<Object>();
} else if (partitioner == null) {
partitioner = new RebalancePartitioner<Object>();
}
if (partitioner instanceof ForwardPartitioner) {
if (upstreamNode.getParallelism() != downstreamNode.getParallelism()) {
throw new UnsupportedOperationException("Forward partitioning does not allow " +
"change of parallelism. Upstream operation: " + upstreamNode + " parallelism: " + upstreamNode.getParallelism() +
", downstream operation: " + downstreamNode + " parallelism: " + downstreamNode.getParallelism() +
" You must use another partitioning strategy, such as broadcast, rebalance, shuffle or global.");
}
}
StreamEdge edge = new StreamEdge(upstreamNode, downstreamNode, typeNumber, outputNames, partitioner, outputTag);
getStreamNode(edge.getSourceId()).addOutEdge(edge);
getStreamNode(edge.getTargetId()).addInEdge(edge);
}
}
3.1 WordCount函数的StreamGraph
Flink提供了一个StreamGraph可视化显示工具,在这里
我们可以把我们的程序的执行计划打印出来 System.out.println(env.getExecutionPlan()); 复制到这个网站上,点击生成,如图所示:

可以看到,我们源程序被转化成了4个operator。另外,在operator之间的连线上也显示出了Flink添加的一些逻辑流程。由于我设定了每个操作符的并行度都是1,所以在每个操作符之间都是直接FORWARD,不存在shuffle的过程。
4.JobGraph的生成
Flink会根据上一步生成的StreamGraph生成JobGraph,然后将JobGraph发送到server端进行ExecutionGraph的解析。
4.1 JobGraph生成源码
与StreamGraph类似,JobGraph的入口方法是
1 | StreamingJobGraphGenerator.createJobGraph() |
1 | private JobGraph createJobGraph() { |
4.2 operator chain的逻辑
为了更高效地分布式执行,Flink会尽可能地将operator的subtask链接(chain)在一起形成task。每个task在一个线程中执行。将operators链接成task是非常有效的优化:它能减少线程之间的切换,减少消息的序列化/反序列化,减少数据在缓冲区的交换,减少了延迟的同时提高整体的吞吐量。
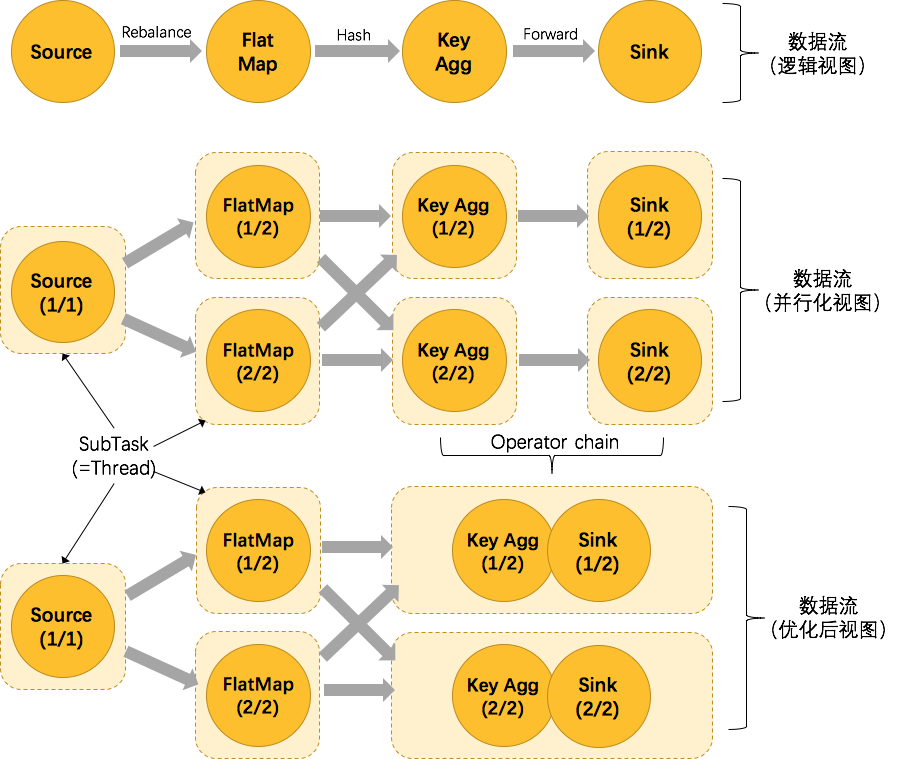
上图中将KeyAggregation和Sink两个operator进行了合并,因为这两个合并后并不会改变整体的拓扑结构。但是,并不是任意两个 operator 就能 chain 一起的,其条件还是很苛刻的:
- 上下游的并行度一致
- 下游节点的入度为1 (也就是说下游节点没有来自其他节点的输入)
- 上下游节点都在同一个 slot group 中(下面会解释 slot group)
- 下游节点的 chain 策略为 ALWAYS(可以与上下游链接,map、flatmap、filter等默认是ALWAYS)
- 上游节点的 chain 策略为 ALWAYS 或 HEAD(只能与下游链接,不能与上游链接,Source默认是HEAD)
- 两个节点间数据分区方式是 forward(参考理解数据流的分区)
- 用户没有禁用 chain
Flink的chain逻辑是一种很常见的设计,比如spring的interceptor也是类似的实现方式。通过把操作符串成一个大操作符,Flink避免了把数据序列化后通过网络发送给其他节点的开销,能够大大增强效率。
4.3 JobGraph的提交
前面已经提到,JobGraph的提交依赖于JobClient和JobManager之间的异步通信,如图所示:
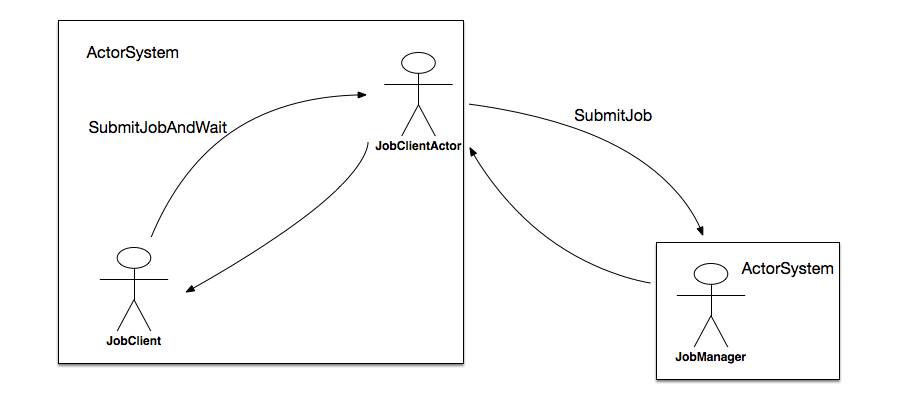
在submitJobAndWait方法中,其首先会创建一个JobClientActor的ActorRef,然后向其发起一个SubmitJobAndWait消息,该消息将JobGraph的实例提交给JobClientActor。发起模式是ask,它表示需要一个应答消息。
1 | Future<Object> future = Patterns.ask(jobClientActor, new JobClientMessages.SubmitJobAndWait(jobGraph), new Timeout(AkkaUtils.INF_TIMEOUT())); |
该SubmitJobAndWait消息被JobClientActor接收后,最终通过调用tryToSubmitJob方法触发真正的提交动作。当JobManager的actor接收到来自client端的请求后,会执行一个submitJob方法,主要做以下事情:
- 向BlobLibraryCacheManager注册该Job;
- 构建ExecutionGraph对象;
- 对JobGraph中的每个顶点进行初始化;
- 将DAG拓扑中从source开始排序,排序后的顶点集合附加到Exec> - utionGraph对象;
- 获取检查点相关的配置,并将其设置到ExecutionGraph对象;
- 向ExecutionGraph注册相关的listener;
- 执行恢复操作或者将JobGraph信息写入SubmittedJobGraphStore以在后续用于恢复目的;
- 响应给客户端JobSubmitSuccess消息;
- 对ExecutionGraph对象进行调度执行;
最后,JobManger会返回消息给JobClient,通知该任务是否提交成功。
5.ExecutionGraph的生成
与StreamGraph和JobGraph不同,ExecutionGraph并不是在我们的客户端程序生成,而是在服务端(JobManager处)生成的,顺便Flink只维护一个JobManager。其入口代码是:
1 | ExecutionGraphBuilder.buildGraph(...) |
该方法长200多行,其中一大半是checkpoiont的相关逻辑,我们暂且略过,直接看核心方法 executionGraph.attachJobGraph 因为ExecutionGraph事实上只是改动了JobGraph的每个节点,而没有对整个拓扑结构进行变动,所以代码里只是挨个遍历jobVertex并进行处理:
1 | for (JobVertex jobVertex : topologiallySorted) { |
至此,ExecutorGraph就创建完成了。